Published Date: September 1, 2022 | Last Updated: April 17, 2024
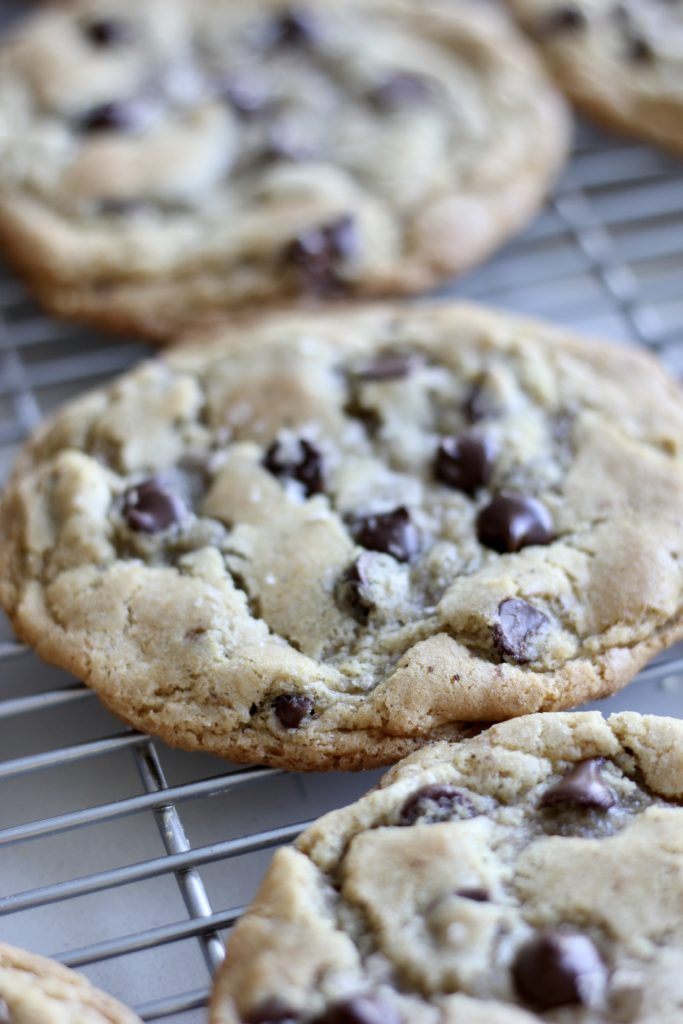
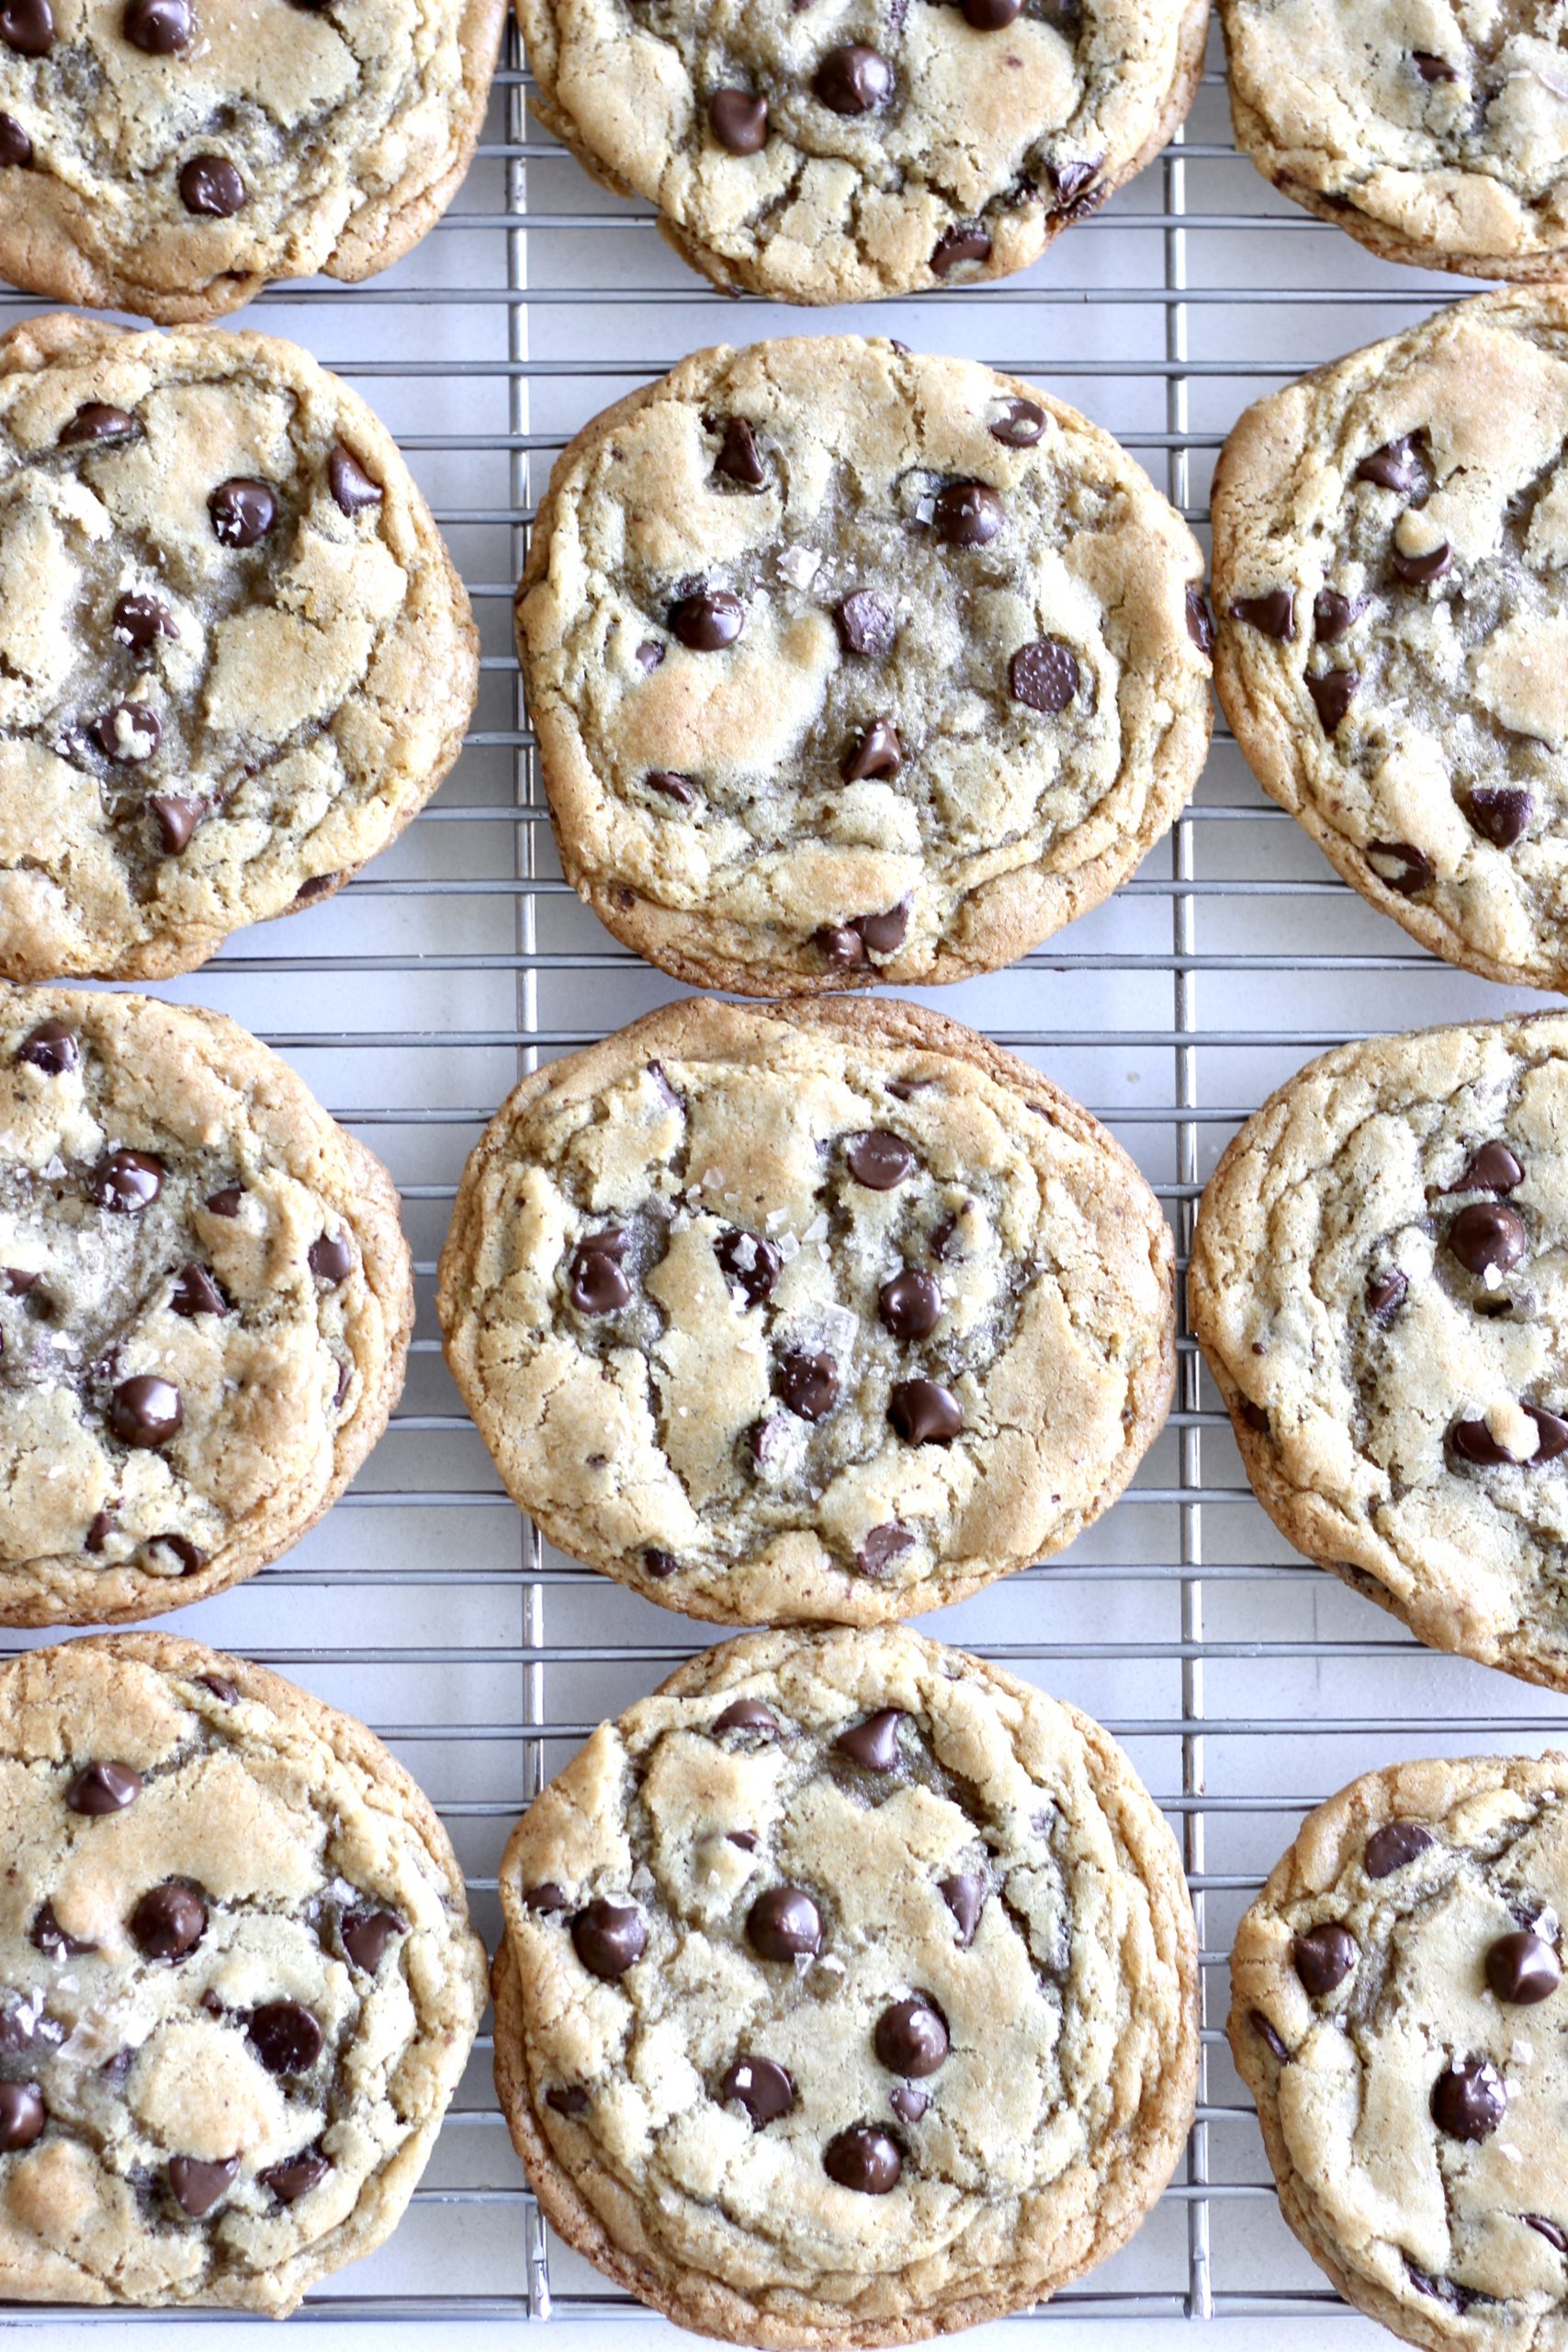
This post contains affiliate links and I may receive a commission on your purchase. Thank you for shopping through my links. Hands down my favorite cookie! The browned butter combined with the sourdough discard takes the flavor to the next level! Oh, and the course salt on the top? It makes it! These are big, chewy, and delightful. I’m certain
This post contains affiliate links and I may receive a commission on your purchase. Thank you for shopping through my links.
Hands down my favorite cookie! The browned butter combined with the sourdough discard takes the flavor to the next level! Oh, and the course salt on the top? It makes it! These are big, chewy, and delightful. I’m certain you will love them!
HOW DID THIS RECIPE COME TO BE?
I started playing around with some of my cookie recipes by simply adding sourdough discard to them. The results were unremarkable. Most of them were a little too cake-y in texture and tasted a little too sour for a cookie.
I kept making tweaks and finally decided that browned butter is the way to go as far as sourdough cookies are involved. Browning the butter not only provides a fantastic flavor boost, but makes these cookies work so well with sourdough as it eliminates any extra water content in the dough. I took inspiration where I could find it and kept practicing… er… making cookies. (My job is so hard!) With the combination of browned butter, sourdough discard, the perfect ratio of brown sugar, white sugar, egg yolks and sea salt, I finally have a winning recipe!
I made these cookies a few nights ago and took some extra cookies around to a few neighbors. They all LOVED THEM! Read below to hear how they reacted:by
TEXTS I GOT FROM AFTER GIVING THESE COOKIES AWAY:
TEXT ABOVE FROM MY FRIEND AND NEIGHBOR MANDY:
TEXT BELOW FROM MY FRIEND AND NEIGHBOR KATE:
TEXT BELOW FROM MY FRIEND AND NEIGHBOR NATALIE:
TEXT BELOW FROM MY FRIEND AND NEIGHBOR KARA
TEXT BELOW FROM MY FRIEND AND NEIGHBOR KADEE
I think it’s safe to say that the cookie was a huge hit with my friends and neighbors! I wasn’t quite sure if my own kids would like these… because sourdough and all, but my kids LOVED them and said they were the best cookies they have ever had! As for me, these are hands down, my FAVORITE cookie. The chewy texture is just right. Crisp on the outside, soft on the inside and super chewy. And the flake salt on the top just makes them so dang good!
WHY SOURDOUGH?
Haha, why not sourdough?
Ok, I’ll be honest. Not every baked good is better with sourdough. One time I made sourdough brownies and I had to throw them away, nobody liked them. Another time I made a sourdough chocolate cake and it was so crumbly and dry it was hard to eat. So adding sourdough to just anything isn’t always guaranteed to make it better. But occasionally, when combined by specific recipe tweaks, it can improve the baked good. And this cookie is the prime example of something being improved by adding sourdough to it!
This is what sourdough discard does for these cookies:
Improves the texture, making the cookies more chewy.
Makes the cookies taste more buttery!
Provides a good way to use up some sourdough discard!
Ferments the flour making the cookies easier to digest
Provides some prebiotics to the cookies
WHAT KIND OF SOURDOUGH STARTER SHOULD I USE?
For this recipe you are going to use DISCARD.
DISCARD is unfed, flat and runny starter. It will have no bubbles in it, and in texture it will resemble heavy whipping cream.
This recipe won’t work very well with active starter, since that will thicken the cookie dough too much.
Do you already have some sourdough starter? If so, use some of that- just in the discard state.
Remember that starter is either in one of two states: Fed (active) or unfed (discard). If your starter is fed and active, you will need to leave it at room temperature and wait for it to deflate and become flat and runny before you use it for this recipe.
If you have some discard starter, but not enough for this recipe, then feed it so that the total volume is at least 1 + 1/4 cup. After the feed it may activate, fill with bubbles, increase in volume, and then as it sits longer at room temp it will deflate and become runny…. turning into “discard” after about 20-24 hours. You will use 1 cup of discard for this recipe and then you will have 1/4 cup for your reserve starter that you can feed when you need it again for you next sourdough baking adventure.
If the starter that you have has been neglected for a while in the back of your fridge, or if it smells super sour, or like acetone nail polish remover, then it needs to be freshened up before you add it to this recipe. because, shocker….. nobody wants to eat acetone cookies. You can “freshen” your starter simply by feeding it. To feed, take 2 tablespoons of your unfed starter, and feed it 1 heaping cup of flour and 1 cup of water. Mix together, cover, and let it sit at room temp for 24 hours. During the time the starter may or may not activate, fill with bubbles, double in volume, then deflate and become flat and runny. Then it will be freshened up, not too sour, and ready to be added into a discard recipe!
WHAT IF I DON’T HAVE ANY SOURDOUGH STARTER?
If you do not already have some sourdough discard, then some ways of obtaining one are:
Asking a friend for some starter (no really, get on social media and tell your friends/family that you just need a couple tablespoons of starter. I bet someone will give you some! Then take the couple tablespoons that they give you and feed it so you have more starter!)
Buy some starter online or from a bakery(there are so many sources online to buy one! Google it!)
Make your own starter(the process takes anywhere from 2 to 5 weeks with 2 minute daily feedings)
LET’S TALK INGREDIENTS
BUTTER VS. BROWNED BUTTER
If butter is a million dollars, then browned butter is ten million dollars.
If butter is a beautiful flower, then browned butter is a field of flowers.
If butter is seeing a picture of the Eifel Tower, then browned butter is a week long vacation to Paris.
Haha! Okay but seriously, browned butter takes everything that is good about butter, and makes it even better! The flavor and smell are enhanced by simply browning the butter first. The result is a butter that is not only browned in color, but it has more of a nutty, caramel, toasty flavor.
Did you know that in the average stick of butter, it’s generally about 80% fat and 20% water? That means that this process of browning of the butter also helps evaporate all of that water from the butter. Since we are using sourdough, that is an important step, because the sourdough discard already has a fair amount of water, so it’s helpful to be able to eliminate some of the water with browning the butter.
HOW TO MAKE BROWNED BUTTER?
Browning butter is simply cooking the butter until it melts, foams, and cooks the milk solids, which fills the melted butter with brown flecks.
Add your butter to a sauce pan.
Turn on the to medium high heat and allow the butter to melt.
After the butter melts, it will start to foam considerably. Keep going.
Stir the butter as it continues to cook. The foam will slightly subside. While stirring, you’ll notice that the liquid under the bubbles starts to turn brown, and will develop brown flecks. Once the liquid is overall a brown color, remove it from the heat and let it cool.
Once the browned butter is cooled (at least 30 minutes) it’s ready to be used for this recipe. It can stay at room temperature for up to 24 hours before adding it to this recipe.
If needed, you can store the browned butter in an airtight container and refrigerate for up to three days. Just let it come to room temperature before adding it to this recipe.
UNSALTED BUTTER VS. SALTED BUTTER
I use salted butter for just about everything… (sorry baking purists) So if you prefer to use unsalted butter, use the adaptation below.
UNSALTED BUTTER ADAPTATION:
If you are using unsalted butter, increase the salt in the recipe from 1/2 teaspoon to 1 teaspoon salt.
SALT
This recipe is unique because there are three instances where you have to be mindful of salt. Those are:
Whether or not you will be using salted or unsalted butter
Adjusting the amount of salt in the recipe for which butter you use
The only salt I use is REDMOND REAL SALT. I love it because it is pure, unprocessed, and full of naturally-occurring trace minerals. It has no fillers, anti-caking agents, additives or unhealthy pollutants. Redmond real salt has been mined from an ancient sea bed in central Utah- making it true, mineral rich sea salt! I get my salt HERE.
You can get 15% off with my affiliate discount code, “AMBERSKITCHEN”.
To make it more cost effective, I buy in bulk and order a 25 POUND BAG of salt every few years. I store it in a bucket or in mason jars and it lasts me a few years.
EGG
For this recipe you will need 3 large Egg yolks. Don’t go for the full egg, we need all that fat from the egg yolks!
BROWN SUGAR & WHITE SUGAR
For this recipe you’re going to add a cup of both white cane sugar and brown sugar. When using brown sugar, try and use dark brown sugar (if available) and pack the brown sugar down into the measuring cup.
FLOUR
You’re gonna want to use ALL PURPOSE FLOUR for this recipe.
Use whatever you like best! For me, milk chocolate is a little too sweet, so I love to use Semi-Sweet. But any good quality chocolate will work!
If using chocolate chips, you will need one, 12 oz. bag of chocolate chips (1 1/2 cups) PLUS MORE CHOCOLATE for the tops of the cookies- about another 1/2 cup. Plan on using about 16 oz. of total chocolate. Don’t skimp on the chocolate!
INGREDIENTS BY WEIGHT
If you need weight measurements, this is for you!
Flour: 380 g
Butter: 227 grams (before being browned)
White cane sugar: 215 grams
Brown Sugar: 215 grams
Egg yolks: 54 grams
Sourdough discard: 220 grams
Chocolate chips: 450 grams
Weight measurement not provided for salt, vanilla, baking powder or baking soda.
TEST THE DOUGH BY BAKING A SINGLE COOKIE
Right after you make the dough, but before you chill the dough and let it ferment, you have a chance to test out the dough and make sure that the amount of flour is correct. The amount of a flour in a recipe can vary each time you make it just based on the humidity in the air, the weather, and your elevation. Even with using the same exact recipe by weight, you may sometimes need to tweak the amount of flour added to cookie dough.
Right after the dough has been made, preheat your oven to 350 degrees, and roll a 1/4 cup of dough into a smooth ball. Bake the single cookie. Give it a few minutes to cool, then ask yourself…
How did it turn out?
Is it chewy or cakey?
Is it extraordinarily flat?
Does it look just right?
If the cookie is too flat, go ahead and add up to 4 more Tablespoons of flour to the remaining dough.
If the cookie is chewy, then do nothing, because chewy cookies are the best cookies! Unless you prefer your cookies to be cakey rather than chewy, in which case go ahead and add 1/4 cup of flour to the dough.
If it looks just right, then give yourself a pat on the back!
CAKEY COOKIES VS. CHEWY COOKIES
Are you team cakey cookies? Or team chewy cookies? To me, the chewy factor is of super important!
Remember, you don’t want to add too much flour.
Too much flour = a cakey, puffy cookie.
Just enough flour = a chewy cookie
not enough flour = extraordinarily flat cookie
It’s a delicate balance!
It’s helpful to bake a single cookie after you make the dough to make sure it’s got the right amount of flour!
CHILLING OR FREEZING DOUGH BALLS
To get the full “sourdough” effect, you’re going to want to refrigerate your dough for a period of time to let it ferment. You can refrigerate it for as little as 1 hour or for as long as 72 hours. The longer it is refrigerated, the more it ferments, and the more the sourdough can work it’s magic on the dough.
It can be difficult to scoop cold dough into balls, so feel free to form the dough in to 1/4 cup round smooth balls right after making the dough, while it’s room temp and before refrigerating. After your form them into balls, just be sure to put them in an airtight bag or container, then quickly transfer to the fridge.
You can also freeze the dough balls for another time! Just form the dough balls, then put them onto a flat surface to flash freeze for about an hour until firm. Then take dough balls and put them into an airtight bag or airtight container, and put them back into the freezer. When you want to bake them, transfer the frozen dough balls straight onto the baking sheet. Reduce oven temp to 325 and increase bake time by two to five minutes- but keep an eye on them!
DIRECTIONS
Brown the butter. Do this by adding the butter to a saucepan over medium heat. letting it melt, then foam, then when the liquid becomes brown underneath the bubbles and brown flecks appear, it’s done! Remove from heat.
Let the butter cool to room temp, at least 30 minutes.
Prepare one cup of sourdough discard. (Notes above on how to make discard).
Combine the browned butter and both sugars. Beat together with an electric hand mixer or with a stand mixer. The mixture will look a bit dry and crumbly, like semi- wet sand.
Add the egg yolk to the mixture and beat with an electric mixer for a couple of minutes. As you continue beating, the mixture will become lighter and fluffier.
Add the sourdough discard and beat together until just barely combined. The dough will look more like cake batter than cookie dough. don’t fret.
Add the salt, baking soda, baking powder and vanilla. Mix until combined.
Add the flour and mix together by hand until just barely combined, being careful not to overmix.
Add the chocolate chips and mix together by hand.
Test the dough. This is an optional step, but helps you to prevent cookies from coming out flat. Bake one, 1/4 cup sized ball of dough at 350 for 12-13 minutes. Depending on you elevation and the weather outside, the cookie dough texture can vary a bit. Testing one dough ball allows you to see if the cookie comes out well. If it is too flat, then the dough needs about 1/4 cup more flour. If it is just right, then leave it be and continue on to the next step.
Cover the bowl of dough with plastic or a lid, and refrigerate. OR, roll into balls and transfer to an air tight container and refrigerate. Let the dough stay in the refrigerator to ferment for anywhere from one hour to seventy-two hours. I usually aim for about 4 hours. The longer it sits in the fridge, the more fermentation will happen and the more sour the cookies will taste.
Remove the dough from the fridge and scoop in into a smooth 1/4 cup balls if you haven’t already. Place six dough balls on each baking sheet. Top the dough balls with a few more chocolate chips.
Bake the dough balls for 13-14 minutes, or until edges just begin to brown.
Remove from oven, and place {even more} chocolate chips on the top of each cookie…. just to make it look pretty. Then sprinkle the cookies with some COURSE SEA SALT FLAKES.* (Honestly… don’t skip this! It’s so good!)
Let cookies cool on a cooling rack. Serve immediately, and freeze any leftovers!
Hands down my favorite cookie! The browned butter combined with the sourdough discard takes the flavor to the next level! Oh, and the course salt on the top? It makes it! These are big, chewy, and delightful. I’m certain you will love them!
1cupsalted buttersee note above for unsalted butter adaptation
1cupwhite cane sugar
1cuppacked brown sugar
3egg yolks
1cupflat and runny sourdough discard220 grams
1teaspoonbaking soda
1teaspoonbaking powder
1/2teaspoonfine sea salt
1teaspoonvanilla
2 1/4cupsall purpose flour
12oz.chocolate chipsabout 1 1/2 cups or one bag for cookie dough
4oz.1/2 cup chocolate chips for pressing into the top of the cookies
sprinkle of course flake salt for the tops of cookies
Prevent your screen from going dark
Instructions
Brown the butter. Do this by adding the butter to a saucepan over medium heat. letting it melt, then foam, then when the liquid becomes brown underneath the bubbles and brown flecks appear, it’s done! Remove from heat.
Let the butter cool to room temp, at least 30 minutes or longer.
Prepare one cup of sourdough discard. (Notes above on how to make discard).
Combine the browned butter and both sugars. Beat together with an electric hand mixer or with a stand mixer. The mixture will look a bit dry and crumbly, like semi- wet sand.
Add the egg yolk to the mixture and beat with an electric mixer for a couple of minutes. As you continue beating, the mixture will become lighter and fluffier.
Add the sourdough discard and beat together until just barely combined. The dough will look more like cake batter than cookie dough. don’t fret.
Add the salt, baking soda, baking powder and vanilla. Mix until combined.
Add the flour and mix together by hand until just barely combined, being careful not to overmix.
Add the chocolate chips and mix together by hand.
Test the dough. *see note above* This is an optional step, but helps you to prevent cookies from coming out flat. Bake one, 1/4 cup sized ball of dough at 350 for 12-13 minutes. Depending on you elevation and the weather outside, the cookie dough texture can vary a bit. Testing one dough ball allows you to see if the cookie comes out well. If it is too flat, then the dough needs about 1/4 cup more flour. If it is just right, then leave it be and continue on to the next step.
Cover the bowl of dough with plastic or a lid, and refrigerate. OR, roll into balls and transfer to an air tight container and refrigerate. Let the dough stay in the refrigerator to ferment for anywhere from one hour to seventy-two hours. I usually aim for about 4 hours. The longer it sits in the fridge, the more fermentation will happen and the more sour the cookies will taste.
Preheat your oven to 350 degrees.
Prepare a baking sheet by lining it with parchment paper*.
Remove the dough from the fridge and scoop in to smooth 1/4 cup balls if you haven’t already. Place six dough balls on each baking sheet. Top the dough balls with a few more chocolate chips.
Bake the dough balls for 13-14 minutes, or until edges just begin to brown.
Remove from oven, and place {even more} chocolate chips on the top of each cookie…. just to make it look pretty. Then sprinkle the cookies with some coarse sea salt flakes.* (Honestly… don’t skip this! It’s so good!)
Let cookies cool on a cooling rack. Serve immediately, and freeze any leftovers!
Omg! I’ve always made chocolate chip cookies for my family but never with browned butter and starter. I now have a tub of cookies on my counter that I have to control myself not to eat each and every one! What a huge difference using browned butter was! I am now a convert. However I lost count of how many 1/2 cup measures I added. The result were flatter cookies but I would take those over cake like cookies any day so all good. Brilliant recipe- thanks so much!
Best come I’ve ever had! I would pay for this cookie. I long ferment mine in the fridge for 2 days to decrease the gluten. Everyone loves when I make these.
Any chance you could update your recipe to include gram/weight measurements? It’s a perfect recipe except I bake mostly with my scale as it gives you exactness.
I'm obsessed with all things food and a mom to five. Baking bread and using my instant pot are my favorite things to do in the kitchen, and I can't wait to bring all that I have learned to you! Connect with me on Instagram because there's where I basically live these days.


Pingback: Browned Butter Sourdough Chocolate Chip Cookies | Baking It Beautiful
These cookies are phenomenal! Would they turn out just as delicious if I 3 x’s the recipe?
Author
I’m so glad you like them! Yes, go ahead and 3x the recipe!
I have made these cookies 3 different times and they came out perfect! My family loves them.
Thank you for sharing.
Peggy
These cookies are amazing!!
Omg! I’ve always made chocolate chip cookies for my family but never with browned butter and starter. I now have a tub of cookies on my counter that I have to control myself not to eat each and every one! What a huge difference using browned butter was! I am now a convert. However I lost count of how many 1/2 cup measures I added. The result were flatter cookies but I would take those over cake like cookies any day so all good. Brilliant recipe- thanks so much!
Best come I’ve ever had! I would pay for this cookie. I long ferment mine in the fridge for 2 days to decrease the gluten. Everyone loves when I make these.
Hands down best cookies ever! My family loves them!
Delicious! A family favorite! The browned butter really makes the difference.
Where is the weight for the flour?? This is a pretty critical measurement to have!
I have updated the post with the flour measurement!
Any chance you could update your recipe to include gram/weight measurements? It’s a perfect recipe except I bake mostly with my scale as it gives you exactness.
Hi Tracy, I have provided weight measurements in the post above!