Published Date: August 9, 2022 | Last Updated: September 18, 2022
Jump to Recipe Having a sourdough starter may seem overwhelming at first, but I promise, keep at it and don’t give up on it, and you won’t regret it! Once you get the hang of it, you’ll realize it’s quite low-maintenance and forgiving. sourdough isn’t just a trend. it’s a return to the way our ancestors made and ate bread.
Having a sourdough starter may seem overwhelming at first, but I promise, keep at it and don’t give up on it, and you won’t regret it! Once you get the hang of it, you’ll realize it’s quite low-maintenance and forgiving.
sourdough isn’t just a trend. it’s a return to the way our ancestors made and ate bread.
Hundreds, no, thousands of years ago when the very first loaf of leavened bread was baked, that bread was SOURDOUGH. Since the invention of bread up until the early 1900’s, allllll bread was leavened with natural yeast. All of it. For thousands of years, in the many cultures, countries and continents, our ancestors were making and eating sourdough!
Sourdough isn’t just a covid trend.
It’s a lost art.
It’s forgotten history.
It’s the *proper* way to make bread.
It’s also the most *healthy* way to eat bread.
“Sourdough”, or “Natural Yeast” (interchangeable synonyms) had been the standard for thousands of years until suddenly in the early 1900 industrialized quick yeast came to the scene. Quick yeast was so much faster! More convenient! More products could be pumped out at a faster rate! Quick yeast took the world by storm and became the most common way for leavened breads to be made.
I believe that switching to quick yeast didn’t serve us very well. I’m making it my mission to help bring back the lost art of sourdough!
natural yeast compared to industrialized yeast
Breads made with sourdough not only have a richer, deeper flavor (that iconic, subtle sourdough tang!) but they also have a host of digestion benefits that you could never get from quick yeast breads. In fact, for every reason that quick-yeast breads are considered “unhealthy”, the opposite can be said about breads made with sourdough!
1. Sourdough goes through a lengthy fermentation process. The starch is broken down into sugars which then get used by the yeast and organic acids. The organic acids in sourdough slow down the rate at which glucose is released in to the blood stream. Meaning, sourdough has the potential to lower the glycemic index for the current meal and for the next several meals, helping stabilize blood sugar.
2. Because of the long fermentation process that sourdough requires, the natural yeast breaks down and pre-digests the grain, making it so much easier to digest!
3. Many people with gluten sensitivity can handle sourdough with no problem, vs. becoming sick and bloated when eating wheat not fermented with sourdough.
4. Sourdough starter is full of probiotics, which after being fermented and baked into our sourdough bakes turn into prebiotic fuel for our healthy gut bacteria.
5. Sourdough neutralizes phytic acid! This is huge.
what is phytic acid?
Phytic acid is an antinutrient, primarily found in grains, nuts, seeds and legumes.
Phytic acid can inhibit the absorption of the magnesium, iron, calcium and zinc in our diet, making some of the nutrients in the food we eat inaccessible.
The only way to neutralize or break down the phytic acid is with an enzyme called phytase. Unfortunately, humans do not make the needed enzyme: phytase. However, (…… drum roll please …….) The lactic acid bacteria in sourdough produces… PHYTASE! Which means, sourdough breaks down and neutralizes phytic acid! Hallelujah! It’s almost like Sourdough is nature’s way of helping us get the most out of our food! Unless a grain is fermented with sourdough, our bodies are not able to access the full nutrition from the grain.
This is huge. This is why I am so passionate about sourdough!
does sourdough take more time?
Yes. Yes it does. Sourdough takes significantly more time. Instead of taking 2 hours from start to finish when made with active dry yeast, the sourdough version can take up to 24 hours in all. It is a labor of love.
Keep in mind that the amount of HANDS ON time remains the same, however the rising times will take much much longer. They will rise each time until doubled in size, which can take anywhere between 3 to 8 hours per rise.
But is it worth it?
ABSOLUTELY!
how does sourdough taste compared to industrialized yeast?
This is hard to do justice with words alone.
Does sourdough taste sour? Well yeah, there is a subtle “tang” to it. But I think maybe the best way to describe it, is that it tastes more “deep”. The flavor has more of a fantastic DEPTH. It’s delicious. Here are a few things I have noticed about the taste of sourdough.
1. Sourdough is an acquired taste. A few years ago when I transitioned all of my baking to sourdough, my kids and husband weren’t sure about it. These sourdough waffles, and their beloved white sandwich bread now had a bit of a tang to it. It did taste different. It did add a mild, tang to the flavor. They protested at first. And that lasted about a month. And then our taste buds gradually started to shift and we started to grow fond of the mild tang in the flavor. And now, whenever we eat a non-sourdough bread product, the flavor falls short. After two plus years of eating almost exclusively sourdough bread products, we prefer the flavor of sourdough to regular bread!
2. You can make the flavor LESS SOUR by adding sweeteners to the recipe. These cinnamon rolls, for example don’t have a strong sour flavor because the sweet flavor is so prominent.
3. You can make the flavor more sour by doing a long ferment. Putting the dough in an airtight container and into the fridge for 24-72 hours will sour up the dough.
4. You can make the flavor more sour by stirring the hooch intoyour starter. The “Hooch” is the liquid that can accumulate at the top of your sourdough starter. It is the waste product of the starter itself, and it has a pungent sour smell to it. I usually pour off my hooch when I feed my starter, but if you want to, go ahead and mix it in, which will make your sourdough bakes even more sour.
5. The more sourdough starter a recipe has in it, the less sour it will be. This seems like a false statistic, but it’s true! The greater the percentage of sourdough starter, the less sour the dough will be and visa versa.
some sourdough lingo
NATURAL YEAST = SOURDOUGH = WILD YEAST These are all interchangeable synonyms.
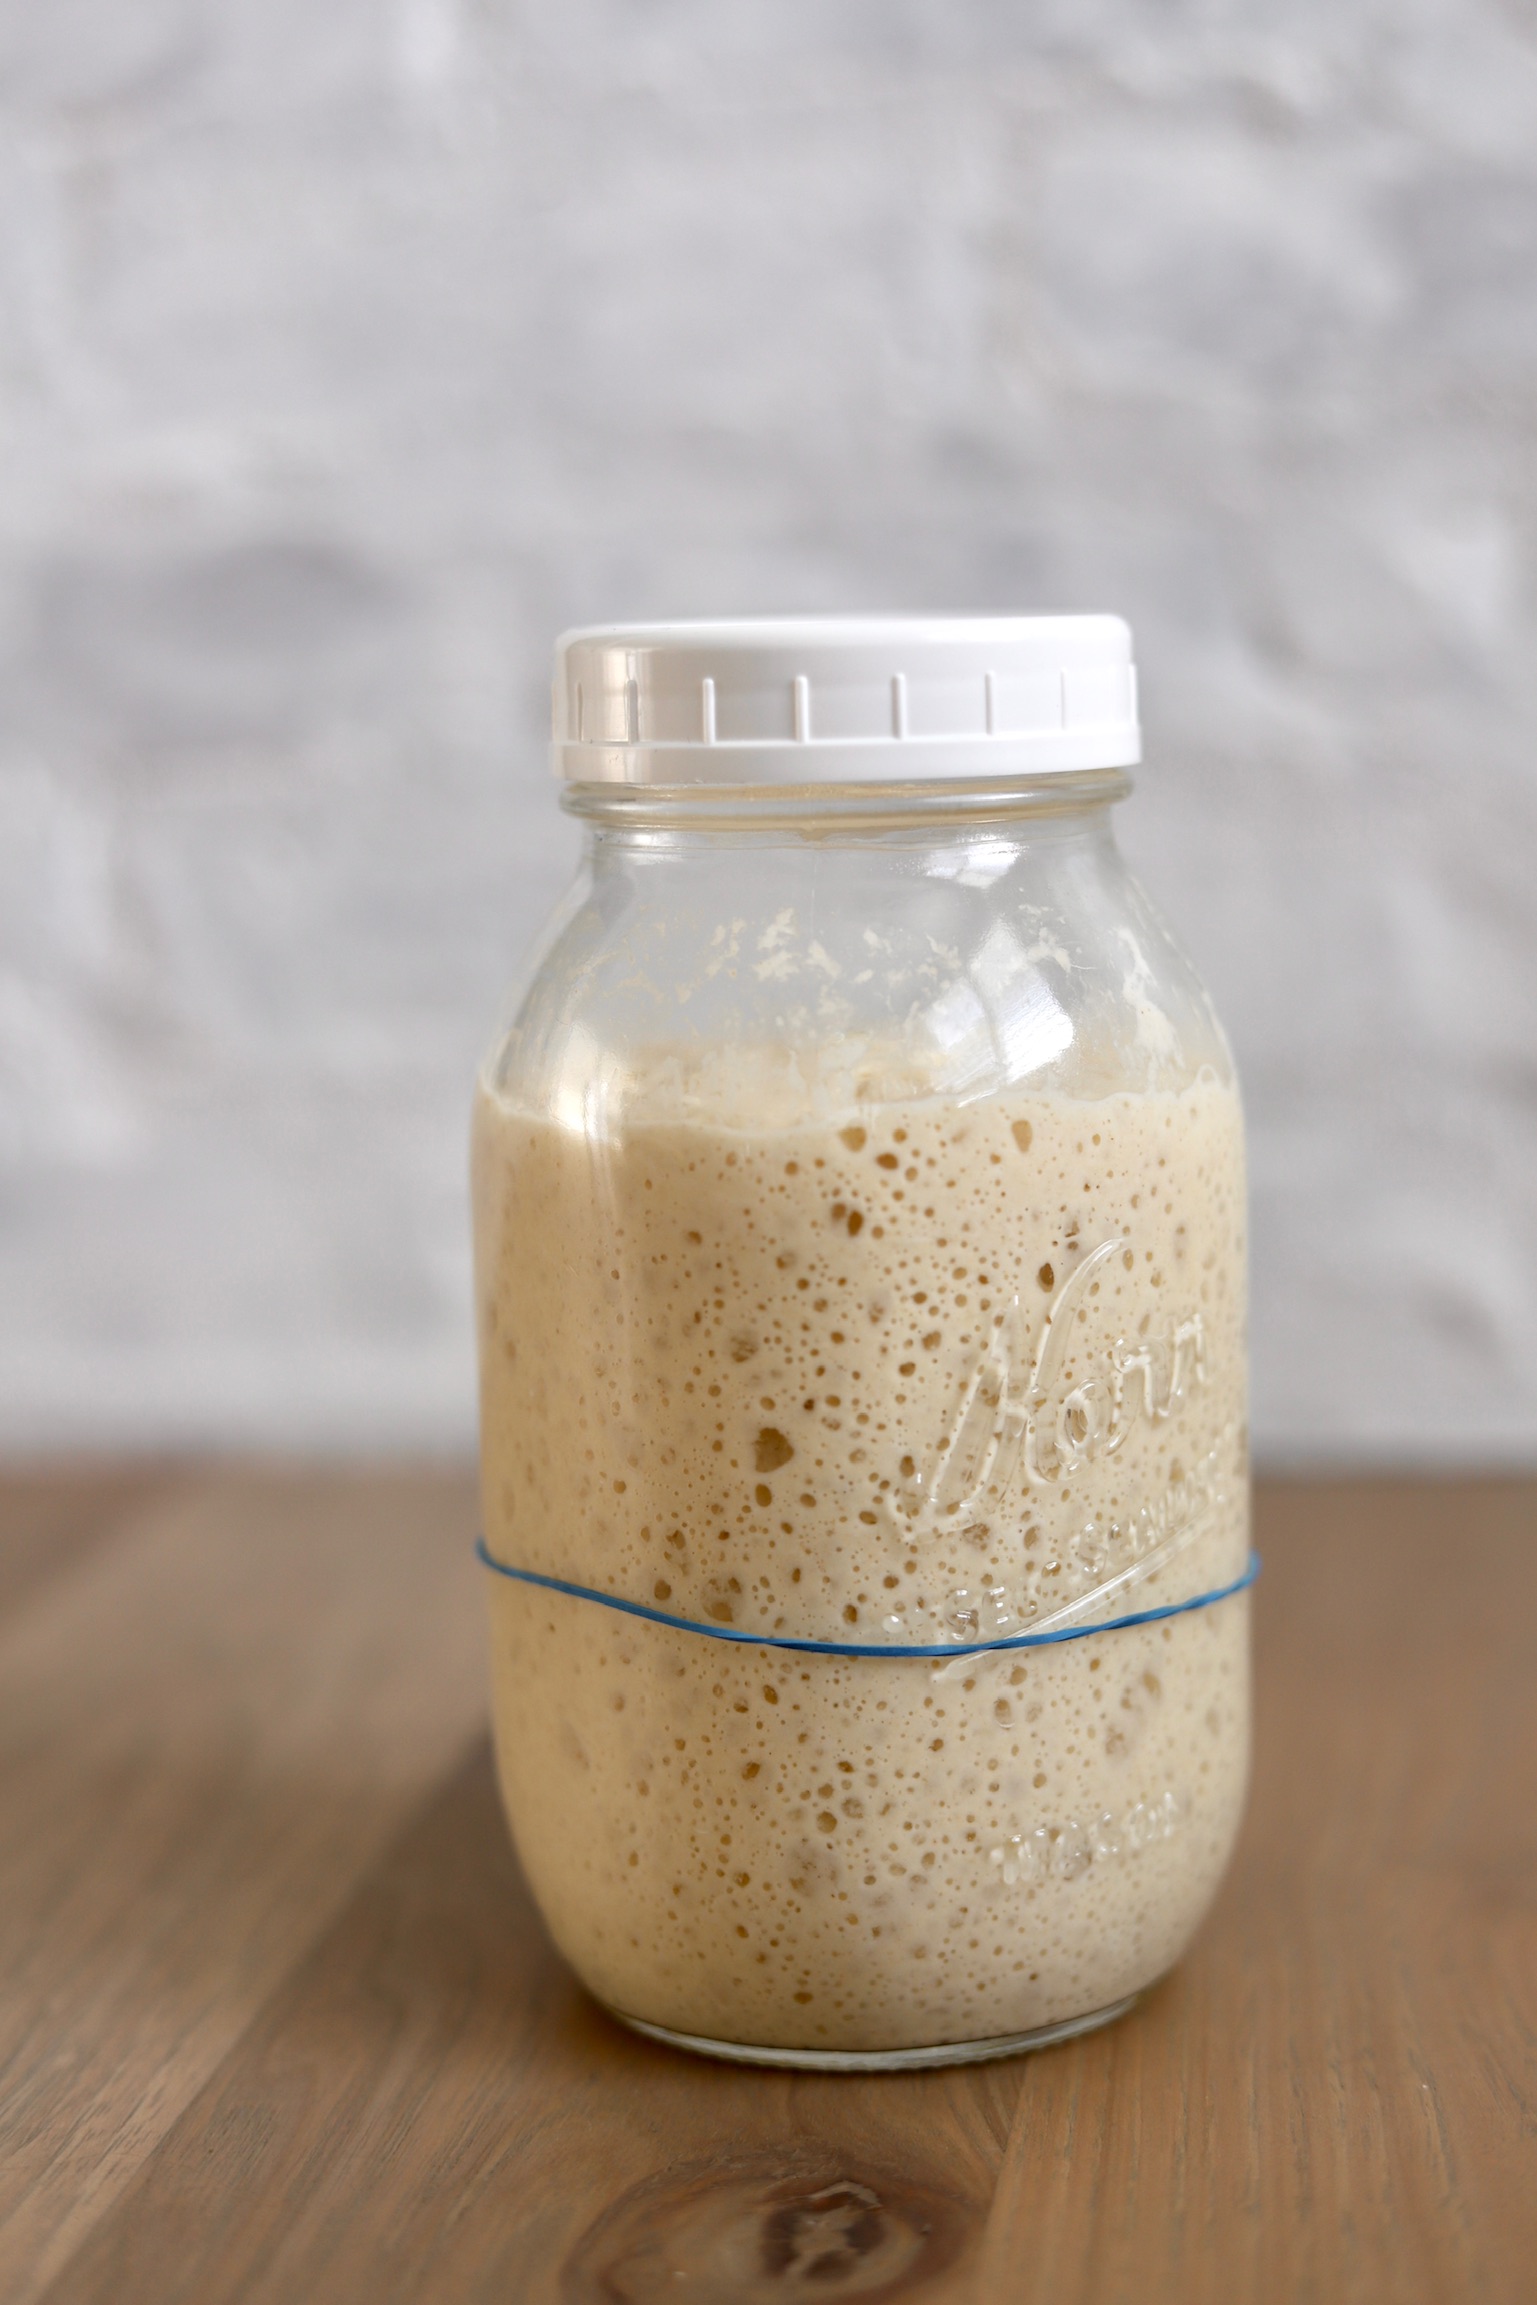
ACTIVE STARTER: A synonym for this is LEVAIN. Active starter is starter that has been activated by a recent meal of flour and water. It is full of bubbles and has about doubled in volume after its feed. Active starter is what is needed to give lift to any leavened bread.
If it is not active and strong, it will not rise your bread. The bigger the feed, the longer it will take to become active. The smaller the feed, the sooner it will become active.
DISCARD: runny starter that is in its inactive state. This can be fed to activate, or you can add the runny discard to most baked goods.
HOOCH: The liquid, sometimes dark colored that accumulates on top of your flat and runny discard starter is called “hooch”. Active starter will never have a hooch. The hooch will only be present once the starter has eaten all of it’s available food and now it is hungry again. The hooch is technically the waste product of the starter. Depending on your preferences, the hooch can be poured off before a feed to maintain a fresh tasting starter. If you prefer your sourdough bakes to taste more sour, stir the hooch in with the feed. Anytime that there is hooch on your starter, clear or dark colored, it means that your starter is HUNGRY.
FEED: Your starter requires only two things. 1- flour and 2- water. A feed is simply giving your starter about equal weights of flour and water, mixed together into your starter until it resembles a thick pancake batter consistency.
POWERFEED: A powerfeed is just a feed ratio that encourages your starter to increase it’s strength and metabolism. This can be used for when your starter has been unfed for a longer period of time, or when your starter seems to be underperforming. Generally the ratio is a very small amount of starter and a large amount of food. A 1:4:4 ratio or a 1:8:8 ratio could be considered a powerfeed (1 part starter: 8 parts water: 8 parts flour). Usually a powerfeed works best when it is done every 12-24 hours for 2-4 days. It really gives a starter a jump start and rev’s up it’s metabolism and strength. For those struggling to get their sourdough to rise, I encourage a series of powerfeeds to help their starter gain strength.
Having a healthy, happy, active sourdough starter is integral in the success of any sourdough recipe. If your starter is weak or has a slow metabolism, it will not be able to successfully rise the dough.
You might wonder how to tell if your sourdough starter is healthy or ready to be baked with. Sourdough can be intimidating at first, but don’t worry it’s really not hard to create a happy and healthy starter!
SIGNS THAT IT IS ACTIVE AND STRONG INCLUDE:
Doubling in size and filling with bubbles after a feed.
Being on a regular feeding schedule, frequently being fed and not left neglected for long periods of time without reviving.
Float test: fill a glass bowl or cup with room temperature water, and drop a spoonful or less of the starter into the water. If it floats, it’s ready to use. If it sinks, your starter will likely need more time to develop more air bubbles and become active, or more feedings.
SIGNS THAT IT IS NOT READY TO USE AND NEEDS ONE OR MORE FEEDING(S) BEFORE IT IS STRONG ENOUGH:
It is flat and runny with no bubbles
It does not rise in volume or fill with bubbles in the hours following a feed.
It smells like vinegar or nail polish remover (a sign that it is over fermented and very hungry)
There is a layer of liquid on the top of the starter
WHAT TO DO IF YOUR STARTER ISN’T ACTIVATING?
Make sure you are feeding it with unbleached flour and filtered water.
Make sure that it is being left in a warm spot to ferment/activate (between 72 degrees and 80 degrees is ideal)
You can temporarily add a bit of whole wheat flour or ground rye flour into the flour used to feed your starter to give it a little extra nutrition
You can give your starter a series of “powerfeeds”: 1 Tablespoon of starter mixed with 1/4 cup of flour and 1/4 cup of water. Mix, cover and let sit at room temperature for 12 hours. Repeat several times over the next few days.
Make sure that your starter hasn’t been contaminated with any type of cleaning products or anything made to kill bacteria. This will kill your starter!
THE SOURDOUGH CIRCLE OF LIFE:
runny discard –> feed it flour and water –> mix –> give it time –> turns into bubbly active starter –> digests all of its food –> turns into runny discard –> feed it flour and water –> mix–> turns into bubbly active starter –> digests all of its food –> turns into runny discard –> REPEAT, REPEAT, REPEAT.
HOW DO I FEED MY STARTER FOR A RECIPE?
Figuring out how to feed and prepare your starter for a feed can be a bit tricky at first, but once you do it a few times, it will make so much more sense!
I like to use less starter and more flour + water because that teaches the starter to digest a large amount of food and to have a strong appetite.
For a typical pre-recipe feed, I like to combine 2 Tablespoons runny discard + 1 cup flour +1 cup water. That’s a 1:8:8 ratio. 1 part runny discard: 8 parts flour: 8 parts water. No need to weigh your ingredients, just mix it together. We are going for a thick, pancake batter consistency, so if it is too thin, add a little more flour. If it is too thick, add a little more water.
This will yield enough for a recipe, (depending on the how much starter is needed for the recipe) plus a little extra starter to have on hand for reserve starter. Keep that reserve starter in the fridge until the next time you’ll be baking sourdough, or give it a maintenance feed in about a week.
You could also do a 1:1:1 feed or a 1:4:4 feed. The bigger the feed, the longer it takes to become active. The smaller the feed, the more quickly it will become active.
Since I like to do bigger feeds, I find that it works best for my lifestyle if I feed my starter a 1:4:4 ratio or 1:8:8 ratio right before I go to bed. It will activate overnight and in the morning I can get started right away on making my dough. It will ferment/rise through the day and then bake it in the afternoon/evening. If I was short on time for my starter to activate, I would just do a 1:1:1 feed, which would only take 2-3 hours to activate.
How do I feed my starter for maintenance?
Will you be using your starter within the next 12-24 hours?
If not, then I recommend giving your starter a small 1:1:1 (1 part starter:1 part flour:1 part water) maintenance feed and refrigerating it. Keep the volume of the starter small-ish (1/2 cup or so) because it’s easy to multiply the volume of the starter once you are preparing for a recipe.
A maintenance feed only needs to be done once per week or even once per month if you really want to push it. Regular feedings will maintain its strength, whereas spacing out your feedings may require powerfeeds in the future to revive the starters strength. I recommend refrigerating a starter that wont be used within the next 12-24 hours.
If you are going to be using your starter and activating it for a recipe within 12-24 hours, then 1- figure out how much starter you are going to need for the recipe, and 2- take into consideration how long it will take to become active. Remember, a small feed will activate much faster (1:1:1 feed takes only a couple hours to activate) while a bigger feed takes longer to activate (1:8:8 feed takes 8-10 hours to activate, so this is ideal for overnight)
Remember, as far as consistency goes; you want a THICK pancake batter texture in your starter after you feed it.
I have a starter… now what?
If you have a brand new starter, congrats!
Prepare to fall in love with your new pet.
Seriously.
Take your starter home and feed it a small meal of flour and water. A 1:1:1 ratio of starter, flour and water is ideal for the first few days.
I would recommend feeding it daily for a few days so that it can acclimate to it’s new environment before you start baking with it. Keep the volume of the starter small at first. It’s easy to multiply the volume of the starter down the road once it’s needed for a recipe. For now, to avoid waste, keep the total volume of the starter at about or less than 1/2 cup. So for example, take 2 tablespoons of starter and mix it with a heaping 2 tablespoons of flour and 2 tablespoons of water. Mix it together until it resembles a thick pancake batter consistency. With any leftover discard, add it into your pancake mix, waffle mix, muffin batter, cookie batter, biscuit dough or into anything that you add flour to. A small amount of discard starter (1/2 cup or so) generally won’t mess with a recipe very much as far as flavor and rise goes. Remember, discard won’t be strong enough to rise bread, but it will enrich the flavor of whatever you add it to.
Did I kill my starter?
It is very common for people to think they killed their starter and to throw it out. A starter dying is VERY RARE. You would be surprised how hard it is to kill. Most likely, you didn’t kill it! A sourdough starter is very resilient and hard to kill! If it’s been in the fridge for months, or even for a year, it’s likely not dead. Pull it out and start reviving it with frequent feedings.
how can I tell if my starter cannot be revived?
Have you fed it daily for at least 10 days with no signs of life? (signs of life would be bubbles!)
Is there pink mold in the starter?
If the answer to either of those questions is yes, then your starter is past the point of no return. Time to get a new one.
how to activate a dehydrated starter:
If you have purchased a dehydrated starter from me or from someone else, here is how you can get it going!
It will take a few days to hydrate this starter acclimate it to its new home, and give it some strength, but you may be able to start baking with it in roughly 5-7 days!
If you are hydrating a starter that you bought from me, then it was built from unbleached Lehi Mills Bread flour. You can transition it to any other unbleached flour.
You will need:
FLOUR… use UNBLEACHED flour. You can use all purpose, bread flour, kamut flour, whole wheat flour, etc. Just make sure it is unbleached.
WATER… use filtered water. Tap water *might* be ok, but let the tap water sit on the countertop for an hour for any chlorine to evaporate. In some instances, tap water does work, in other instances it doesn’t work. All tap waters are different. Statistically, filtered water is the most successful. Do not use distilled water or reverse osmosis water unless it has been re-mineralized. Usually spring water or well water work great as well.
Pick a container to work with that meets the following criteria:
Big enough that it could hold at least 16 oz. of water (pint or quart size would work!)
Has a lid or covering (avoid aluminum lids if possible)
Clear glass or plastic for visibility
Examples:
Wide mouth, 32 oz. glass mason jar with a plastic wide mouth lid
Wide mouth, 16 oz. glass mason jar with a plastic wide mouth lid
Clear glass drinking cup and a plastic wrap “lid”
Clear plastic Tupperware container with lid
Glass weck jar
Day 1: Make sure your container is clean and dry. Into your container, add 3 tablespoons of room temperature filtered water. Open the pouch and pour all of the powder (1 Tablespoon worth) in with the water. Mix together. Cover with a lid and leave at room temperature for 24 hours.
Day 2: You may or not have seen any activity in your jar. It’s ok! Now, add ¼ cup of flour and ¼ cup of water to the jar. Mix. Cover and let sit at room temp for 24 hours.
Day 3: You may or may not have seen any activity in your jar. Either way, let’s keep going! Dump out about half of what is in the jar either into the garbage disposal or into the garbage. With what remains, add to it ¼ cup of flour and ¼ cup of water. Mix together. If the mixture is thicker than a thick pancake batter, add another tablespoon of water. Cover. Using a rubber band or a sharpie, mark the height of the mixture in the jar and check on it over the next few hours to see if it fills with bubbles and if it increases in volume. Make a mental note of what it does. Let it sit at room temperature for 24 hours.
Day 4: Did your starter fill with bubbles and double in volume the previous day?
If yes: Your starter is gaining strength and might be ready to be baked with. If you are wanting to bake with it soon, go ahead and give it a larger feed so that post-feed, the volume of the starter equals the amount needed for your recipe, plus at least ¼ cup starter to have as your “reserve” starter. The reserve amount is what you will feed and use for next time, and it will multiply in volume with every feed! It just keeps on going and going! If you are not using this starter for a recipe, you can keep feeding it daily and keeping it at room temp, or you can transfer to the refrigerator for a low maintenance usage. I keep mine in the fridge unless I’ll be using it for a recipe within 12-24 hours, in which case I’ll bring it out of the fridge, feed it and let it get active for the recipe.
If no: It’s ok! The starter is acclimating to your house, your air, your flour and your water. It needs a few more days. Repeat the steps from day 3 until you notice it reach “active state” which means a few hours after a feed it will fill with bubbles and double in volume. Then a few hours after that, the bubbles will deflate and the volume will come back to where it was right after the feed.
Day 5: If your starter is still not reaching active state, repeat the steps from day 3 until it does.
It may take up to 7 days for your starter to reach active state. If it still hasn’t gotten there after 7 days, then it’s time to evaluate the flour source, water source, and ambient temperature.
sourdough videos i’ve shared on instagram
Here are some examples of content I have shared on Instagram that covers how to work with your sourdough starter:
Ingredients: flour and waterCook: don’t accidentally cook your starter!Total Time per day: 3 minutes Do you have to feed it every day?: Absolutely not! I recommend feeding it once per week and keeping it in the fridge unless you are going to use it within 12-24 hours.
This is where the magic lies! If you have a healthy strong starter, you will be successful in all of your sourdough endeavors!
In a quart size mason jar, combine some of the starter, some of the water and some of the flour. See notes above to determine how much of each you want to feed it.
Mix it together.
If the mixture is thinner than a THICK pancake batter consistency, add a little more flour.
If the mixture is thicker than a THICK pancake batter consistency, add a little more water.
Loosely cover starter with a lid (twisted on but not too tight) and mark the height with a rubber band or with a sharpie. Let starter activate and fill with bubbles. The goal is to have the starter double in volume and fill with bubbles. Once this happens, it is considered activate starter, and you can use it in a recipe.
To replace active dry yeast with natural yeast, simply substitute each Tablespoon of active dry yeast with one cup of bubbly active starter.
Thank you, Amber, for such great and easy to understand info on sourdough! Keeping the starter going can be intimidating for a newbie. I’m SO grateful for your knowledge! I’ll be coming back here again and again.
I'm obsessed with all things food and a mom to five. Baking bread and using my instant pot are my favorite things to do in the kitchen, and I can't wait to bring all that I have learned to you! Connect with me on Instagram because there's where I basically live these days.


I’ve learned so much from Amber about sourdough and have gained so much confidence with my starter!
I learned how to make sourdough starter from Amber. This recipe is amazing and all of her tutorials are super helpful and informative. Thanks, Amber!
So glad that this is helpful to you!
Thank you, Amber, for such great and easy to understand info on sourdough! Keeping the starter going can be intimidating for a newbie. I’m SO grateful for your knowledge! I’ll be coming back here again and again.
Thank you Sara, I’m actually about to post a bunch of new sourdough info, so for sure come back and check it out!